Installing a gas range is not a difficult task, but there are a few things to keep in mind. First, make sure that the area where you will be installing the range is well ventilated. Second, consult with a professional if you are unsure about any part of the installation process.
Finally, be sure to follow all instructions carefully to avoid any accidents.
Gas Range Step by Step Installation | How to Install Gas Connector DIY
If you’re thinking about installing a gas range in your home, there are a few things you need to know first. Gas ranges are a great option for cooking, but they need to be installed correctly to work properly and safely. Here’s what you need to know about how to install a gas range:
1. Make sure you have the right tools. You’ll need a screwdriver, adjustable wrench, pipe cutter, and Teflon tape.
2. Turn off the power to your stove at the circuit breaker.
Then, disconnect the gas line from your old stove (if applicable).
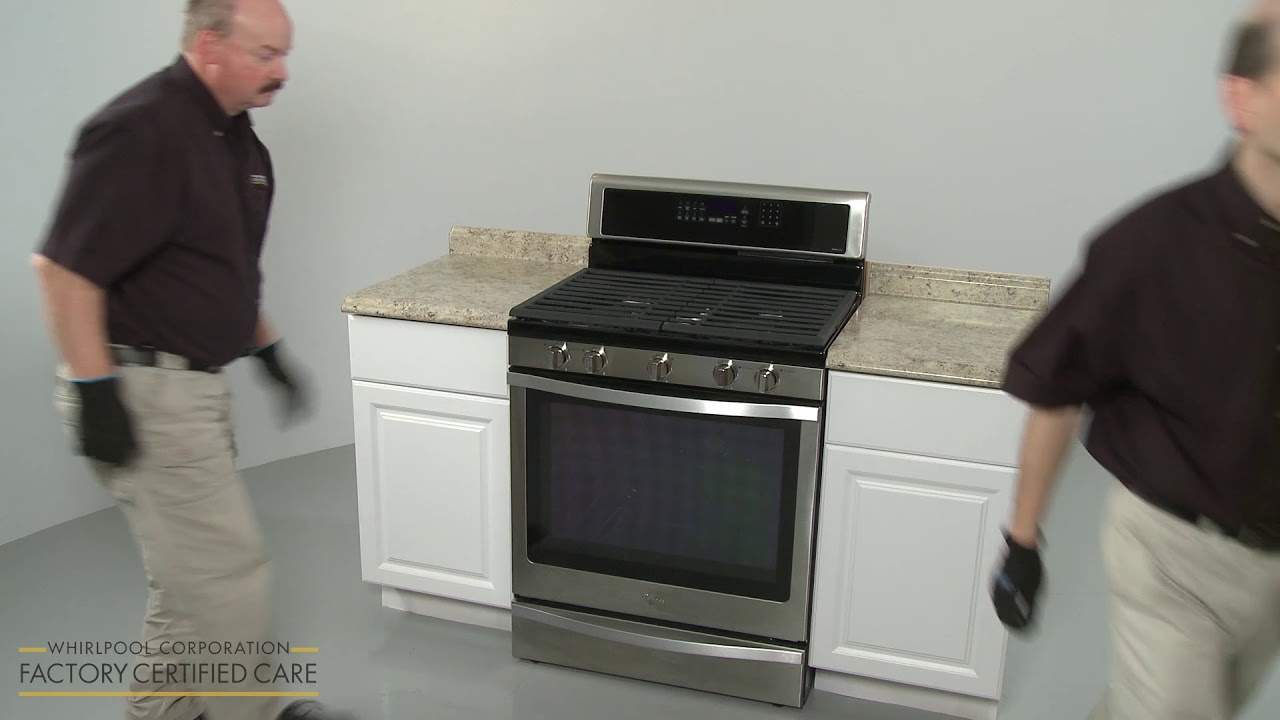
3. Remove any screws or bolts that are holding your old stove in place. Carefully remove it from its location.
4. Place your new gas range in the space where your old one was located. Secure it with screws or bolts if necessary.
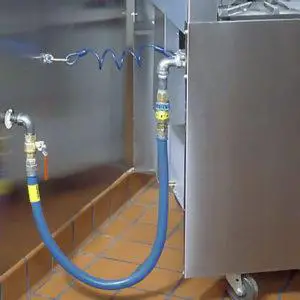
5. Reconnect the gas line to your new stove using Teflon tape on all connections for a snug fit and added safety measure against leaks.
Gas lines should always be checked for leaks before use – use soapy water applied with a brush over all connections until bubbles appear to test for leaks.. If no bubbles appear, then there is no leak!
Proceed to turn on the power at the circuit breaker followed by igniting burner(s) on high briefly then adjusting as needed.. Keep an eye on things while in use initially just in case something isn’t quite right so you can shut off pilot lights/burners as needed.
. Welcome to cooking with gas!
How to Install Gas Line for Stove
Installing a gas line for your stove is a relatively easy process that anyone with basic plumbing skills can do. Here are the steps you need to take:
1. Shut off the main gas valve to your home.
This is usually located near the meter or where the main supply line comes into your house.
2. Cut a hole in the floor near where the stove will be located using a saw designed for cutting through concrete or metal (a regular wood-cutting saw will not work). The hole should be large enough to accommodate the gas line and any fittings you’ll need to make the connection.
3. Run the gas line from the hole in the floor up to where it will connect to the stove. Be sure to leave enough slack in the line so that you can move the stove if necessary. Use pipe tape and fittings as needed to secure everything in place.
4. Connect one end of the gas line to a shut-off valve, then connect this valve to an elbow fitting which will point downwards towards the floor hole. Tighten all connections with a wrench, being careful not over-tighten them and damage anything.
5 .
Have someone else go down into the hole and hold up one end of a length of flexible tubing while you lower down another end attached to your newly installed shut-off valve/elbow fitting assembly . Connect these two ends together using another elbow fitting, then tighten everything securely with wrenches . test for leaks by turning onthe main gas valve slowly and checking all connections with soapy water (bubbles indicate leaks).
If there are no leaks, light your stove and enjoy!
Credit: www.youtube.com
Can I Install My Gas Range Myself?
Installing a gas range is not a difficult task, but there are a few things to keep in mind. First, make sure you have all the necessary tools and supplies before beginning. Second, be familiar with your local building codes and regulations regarding gas lines.
Third, follow the instructions that come with your particular model of gas range.
Assuming you have everything you need and you’re familiar with the local regulations, installing a gas range is relatively straightforward. The first thing you’ll need to do is connect the flexible gas line to the shut-off valve on the wall.
Once that’s done, tighten the connection with a wrench so it’s snug but not too tight. Next, use another wrench to loosen the screws on the back of the oven so you can slide it forward and expose the connections for the gas line.
Connecting the Gas Line
Once the screws are removed, carefully slide outthe ovenand setit asidein an out-ofthe-way place where it won’t get damaged or in anyone’s way. Locate thenaturalgas shut-offvalveon themains supplyline coming intoyour home—it shouldbe right next to wherethegas linecomes throughthewall—and turnit clockwiseso it’s perpendicularto thenaturalgas supplypipe (this shuts offthegas). Now findtheconnectionfor themaleendof theyellowflexiblegashosethat goes fromthenaturalsupplyto yourstovetop;removeanyprotectivecapor coverfrom thisconnection(typicallya smallmetalscrew cap)andhand-tightentheconnectorto thispoint(don’tusetools).
How Do You Set Up a Gas Range?
Assuming you would like a blog post discussing the steps to take when setting up a gas range in your home:
“How do you set up a gas range?”
If you’re lucky enough to have a gas line running into your kitchen, then installing a gas range is relatively easy.
Here are the basic steps:
1. Choose the location for your new range. Keep in mind that gas ranges need to be vented, so make sure there’s a good spot for an exhaust hood.
2. Once you’ve selected the perfect location, position the range so that the cooktop will be level. This is important for both safety and cooking performance.
3. Use plumbers tape to seal any connections between your gas line and the shut-off valve on the back of the range.
This will help prevent any leaks.
4. Next, connect the flexible metal hose that comes with your range from the shut-off valve to the stub out pipe in your wall or floor (this is where your old range was connected). Again, use plumbers tape to ensure there are no leaks at this connection point.
5. Finally, turn on the shut-off valve and check all connections for leaks using soapy water – if bubbles appear, you have a leak that needs to be fixed before proceeding!
6. Once everything looks good, turn on all burners and let them run for about 15 minutes to purge any air from the lines before starting to cook.
Can I Install a Stove Myself?
If you’re considering installing a stove yourself, there are a few things you should keep in mind. First, check with your local building codes to see if there are any requirements or permits needed for installing a stove. Next, take into account the type and size of stove you’ll be installing, as well as the layout of your home and where the best location for the stove would be.
Once you’ve done your research and planning, it’s time to get started on installation.
The first step is to install the chimney or flue that will vent the smoke and fumes from the stove. This is a critical step in ensuring proper ventilation and safety—be sure to follow instructions carefully.
Once the chimney or flue is installed, you can begin putting together the rest of the stove according to manufacturer instructions. If everything is properly installed and vented, then congratulations—you’ve successfully installed a new stove!
What Do You Put behind a Gas Range?
If you’re looking to install a gas range in your kitchen, there are a few things you need to take into account. First, you’ll need to make sure that the area behind the range is properly ventilated. This means installing a vent hood that’s vented to the outside of your home.
You’ll also need to make sure that there’s enough clearance behind the range for the cooktop and oven doors to swing open freely. Gas ranges typically require about 4 inches of clearance on either side, and at least 6 inches of clearance behind the unit. Finally, you’ll need to connect the gas line to the range.
Once all of these installation considerations are taken care of, you can start cooking with your new gas range!
Conclusion
If you’re considering a gas range for your kitchen, here’s a step-by-step guide to help you with the installation process. First, make sure you have the proper tools and supplies on hand. You’ll need a screwdriver, adjustable wrench, pipe thread sealant, and Teflon tape.
Next, shut off the gas supply to your home and disconnect the old range. Once that’s done, you can begin installing your new gas range by connecting the flexible gas line to the shut-off valve. Be sure to use Teflon tape or pipe thread sealant to create a tight seal.
Finally, turn on the gas supply and test your new range to make sure everything is working properly.